In industrial heating systems, thermal oil heaters, thanks to their efficient heat transfer performance, have become core equipment in many production scenarios. As the critical heat transfer medium within the system, the condition of thermal oil directly determines the boiler's operating efficiency and safety. Many users are confused about the replacement cycle for thermal oil. In reality, replacement of thermal oil doesn't follow a fixed schedule; it requires a comprehensive assessment based on operating conditions and oil quality. This article will provide professional guidance on the importance of thermal oil replacement, the dangers of untimely replacement, determining the replacement cycle, replacement indicators, the correct replacement process, and methods for extending the service life.
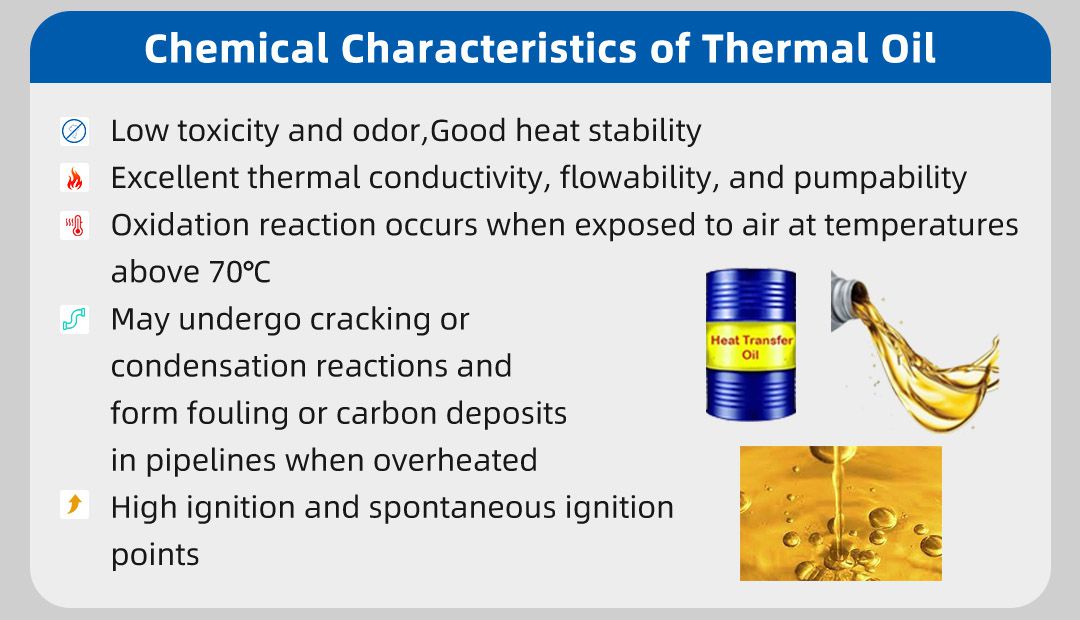
During the operation of a thermal oil heater, thermal oil fulfills the core responsibility of heat transfer. It circulates within the system, steadily delivering heat generated by fuel combustion to various heat-consuming equipment, ensuring precise temperature control during production and maintaining efficient boiler operation. However, due to the influence of the operating environment, thermal oil inevitably ages over time. This degradation is primarily manifested by thermal cracking, oxidation, and polymerization reactions. High temperatures can cause the thermal oil's molecular chains to break (thermal cracking). If the system is not properly sealed, contact with air can trigger oxidation reactions. Furthermore, some small molecules can repolymerize to form large impurities. These changes can gradually degrade the thermal oil's performance. If not replaced promptly, this can negatively impact the operation of the thermal oil heater. Therefore, monitoring the condition of the thermal oil and replacing it promptly are key to ensuring stable operation of the thermal oil boiler.
If thermal oil is not replaced for a long time, its aging process will continue to accelerate. The chemical changes (oxidation, thermal cracking, and polymerization) behind it can directly translate into potential operational problems. The specific consequences are as follows:
Significant decrease in heat transfer efficiency: Aging thermal oil changes its molecular structure, reducing its thermal conductivity and slowing heat transfer. To achieve the target temperature, the thermal oil heater consumes more energy, directly increasing energy consumption.
Increased risk of carbon deposits and blockages in the system: Large molecular impurities produced by thermal oil polymerization gradually deposit on the inner walls of pipes and heat exchanger surfaces, forming carbon deposits. Carbon deposits not only further hinder heat transfer but can also clog narrow pipes, reducing system flow and impacting overall heating efficiency.
Equipment Corrosion and Abnormal Temperature Rising: Oxidation reactions increase the acidity of the thermal oil. These acids corrode the metal components of the thermal oil heater (such as pipes and the boiler body), shortening the equipment's service life. Furthermore, carbon deposits and oil degradation significantly slow the boiler's heating rate, making it difficult to meet the stable temperature requirements of production.
Increased Safety Risks: Aged thermal oil significantly reduces its flash point (a key indicator of flammable liquid safety), making it more susceptible to ignition and increasing the risk of fire. Furthermore, low-boiling-point impurities produced by thermal decomposition can create oil vapor resistance, leading to system pressure fluctuations and even localized overpressure.
There's no unified, fixed standard for thermal oil replacement in the industry. The replacement cycle should be determined based on the actual operating conditions of the thermal oil heater and the following factors:
Operating temperature and system type: Different types of thermal oil heaters (e.g., high-temperature, closed systems and open systems) significantly affect thermal oil aging. In open systems, the thermal oil has a larger contact area with air, leading to faster oxidation. Higher operating temperatures increase the intensity of thermal cracking and polymerization reactions, accelerating the aging of the thermal oil.
Thermal oil degradation rate: The degradation rate varies depending on factors such as system sealing and operating procedures (e.g., frequent over-temperature operation). Even for the same type of thermal oil, its service life can vary significantly under different operating conditions.
Oil quality testing: Oil quality testing is the key factor in determining whether thermal oil needs replacement, rather than simply based on age. Professional testing can accurately assess changes in thermal oil performance, avoiding wasteful premature replacement or equipment problems caused by delayed replacement.
Based on industry practice, the following general recommendations apply: Under normal operating conditions (system airtightness, stable operating temperature within design limits), the thermal oil can be fully inspected every 2-3 years, with replacement determined based on the results. However, if the thermal oil heater is exposed to high temperatures (>200°C) or is frequently started and stopped, the thermal oil will age faster. Therefore, annual oil quality testing is recommended, with timely replacement based on the results.
Determining whether thermal oil needs replacement can be determined through a comprehensive evaluation of three dimensions: visual observation, performance perception, and laboratory testing. Specific indicators are as follows:
Color Change: Normal thermal oil is mostly light yellow or transparent. If the color gradually deepens, eventually turning dark brown or even black, it indicates that the thermal oil has aged significantly and has accumulated a large amount of impurities.
Viscosity Change: Dip a glass rod or sampling spoon into the thermal oil. If the oil becomes noticeably thicker, becomes less fluid, or adheres to the container wall, making it difficult to drip, it indicates that the thermal oil has polymerized and its viscosity has increased.
Emulsification or Turbidity: If the thermal oil becomes emulsified (milky white) or noticeably turbid, it usually indicates that water has entered the system (e.g., a cooling system leak or condensate ingress due to high humidity). This water can exacerbate oxidation of the thermal oil and may cause air lock in the system. Immediate attention should be paid to the oil and replacement should be considered.
Slowed Heating Rate: At the same heating power, the thermal oil heater takes significantly longer to reach the target temperature, or the temperature rise of various heating devices is uneven. After eliminating heating element failure, this is often due to decreased heat transfer efficiency of the thermal oil, indicating oil quality deterioration.
Abnormal Temperature Fluctuation: During operation, the outlet temperature of the thermal oil heater or the temperature of the heating device fluctuates frequently and is difficult to stabilize within the set range. This may be due to changes in thermal oil viscosity causing unstable flow rate, or carbon deposits affecting heat transfer uniformity. Further analysis is required in conjunction with oil quality testing.
Laboratory testing is the most accurate basis for determining whether thermal oil replacement is necessary. The core test indicators and reference limits are as follows:
|
Test Parameter |
Reference Limit |
Parameter Description |
|
Viscosity Change |
±20% |
If the viscosity of the thermal oil changes by more than ±20% compared to the initial value, it indicates significant deterioration of the oil quality (an increase may be due to polymerization, a decrease may be due to thermal cracking). Heat transfer performance and fluidity will be severely affected. |
|
Acid Value |
>0.5 mgKOH/g |
An acid value exceeding this limit indicates severe oxidation of the thermal oil. Acidic substances can corrode the metal components of the thermal oil heater, increasing the risk of equipment failure. |
|
Carbon Residue |
>1.5% |
Excessive carbon residue means the thermal oil is prone to forming carbon deposits at high temperatures, which can clog pipelines, reduce heat transfer efficiency, and even cause local overheating. |
|
Flash Point |
Significant decrease (e.g., >10°C drop from initial value) |
A significant decrease in flash point indicates an increase in low-boiling-point impurities in the thermal oil, enhancing the flammability of oil vapors and substantially increasing the risk of fire and explosion. |
The thermal oil replacement process must strictly follow standardized procedures to ensure safe operation and system cleanliness, and to avoid damage to the thermal oil heater due to improper operation. The specific steps are as follows:
Review the thermal oil's MSDS (Material Safety Data Sheet) in advance to understand its physical and chemical properties (such as flash point and corrosiveness) and safety precautions.
Operators must wear professional protective equipment, including oil-resistant gloves, goggles, and protective clothing. If the thermal oil temperature is high, take precautions against burns.
Prepare sufficient waste oil collection containers (which must meet leak-proof and oil-resistant requirements), clean the replacement site, and ensure there are no ignition sources. Keep unauthorized personnel away from the operation area.
Stop the thermal oil heater's heating system and wait until the thermal oil temperature drops below 80°C (to avoid burns or fire caused by high-temperature oil) before proceeding.
Slowly open the system's drain valve and oil drain valve, ensuring the used oil drains evenly into the collection container to avoid splashing caused by a sudden drop in pressure.
During the draining process, the system's vent valve can be opened appropriately to balance internal and external pressures and facilitate complete discharge of the used oil.
If the system piping is long or has dead ends, making it difficult for the used oil to drain naturally, nitrogen purging can be used (the nitrogen must be depressurized and kept within a safe pressure range) to completely remove any remaining used oil and gas.
After draining the old oil, add a dedicated thermal oil system cleaner to the thermal oil heater system. According to the cleaner's instructions, control the temperature (generally 60-80°C) and allow the cleaner to circulate through the system for 2-4 hours to fully dissolve carbon deposits and impurities on the pipe walls.
If carbon deposits are severe (e.g., noticeable black deposits appear on the pipe walls), chemical cleaning alone will be ineffective. A combination of mechanical cleaning (such as high-pressure water jet cleaning or mechanical scraping) and chemical cleaning may be necessary to ensure that no residual impurities remain in the system.
After cleaning, completely drain the cleaner and flush the system one or two times with a small amount of new thermal oil to further remove any residual cleaner and impurities.
Please focus on low-flow areas of the thermal oil heater, such as the expansion tank, pipe elbows, and the bottom of the oil storage tank. These areas are prone to collecting impurities. Open the inspection port or drain valve to confirm that there are no residual impurities or moisture.
Inspect the system for leaks, especially at valves and flange connections. Repair any leaks promptly to prevent leakage after the new oil is added.
Purge the system with dry compressed air or nitrogen to ensure there is no moisture in the system (moisture can cause emulsification and oxidation of the new oil). Samples can be taken for testing to confirm that the system humidity meets the standard.
According to the thermal oil heater manufacturer's specifications, select a suitable new thermal oil type and slowly add it to the system. Avoid filling too quickly and causing air to enter (air can accelerate oxidation of the thermal oil).
During the filling process, monitor the expansion tank level to ensure it remains within the specified range (generally 1/3-2/3 of the tank's capacity). This prevents the system from overflowing due to excessive oil levels or from running low due to excessive oil levels.
After adding new oil, do not immediately raise the system to operating temperature. Dehydrate and degas the system first: slowly raise the system temperature to 100-120°C and maintain for 2-3 hours to allow the dissolved water and light gases in the new oil to evaporate. Keep the vent valve open during this period to release the gases.
After dehydration and degassing, gradually raise the system temperature to normal operating temperature. Observe the system pressure and flow rate for stability. Only after confirming that there are no abnormalities can the system be put into normal operation.
Proper maintenance can effectively slow the aging of thermal oil, extend its service life, and reduce the operating costs of your thermal oil heater. Specific recommendations are as follows:
Maintain a closed circulation system: Ensure the thermal oil heater's circulation system is properly sealed to minimize contact between the thermal oil and air, thus reducing oxidation at the source. For open systems, regularly check the expansion tank seal and install a nitrogen protection device if necessary.
Avoid overheating: Strictly operate the thermal oil heater within its designed temperature range and avoid increasing the operating temperature without authorization due to production needs. Overheating is the primary cause of thermal oil cracking and polymerization. Even brief overheating can significantly shorten the lifespan of the oil.
Regularly clean filters and expansion tanks: Regularly clean the system's filters (such as basket filters and filter elements) to prevent impurities from clogging the pipes and ensure smooth circulation of the thermal oil. Also, regularly remove sediment from the expansion tank to prevent impurities from entering the thermal oil.
Regular sampling and testing: It is recommended to sample and test the thermal oil every 6-12 months. This testing allows you to identify trends in oil quality and take targeted measures (such as adding antioxidants or replacing deteriorated oil) to prevent rapid deterioration.
In summary, the replacement cycle for thermal oil is not fixed and should be determined based on a combination of factors, including the operating temperature of the thermal oil heater, system type, and oil quality test results.
Scientific oil quality testing and regular maintenance are key to ensuring the efficient and safe operation of thermal oil boilers. Properly replacing thermal oil not only reduces energy consumption and minimizes the risk of failure, but also effectively extends boiler life, providing strong support for stable production. If you have questions about the thermal oil status or replacement process, we recommend prompt professional oil testing or consulting with industry professionals to ensure safe and efficient system operation.